

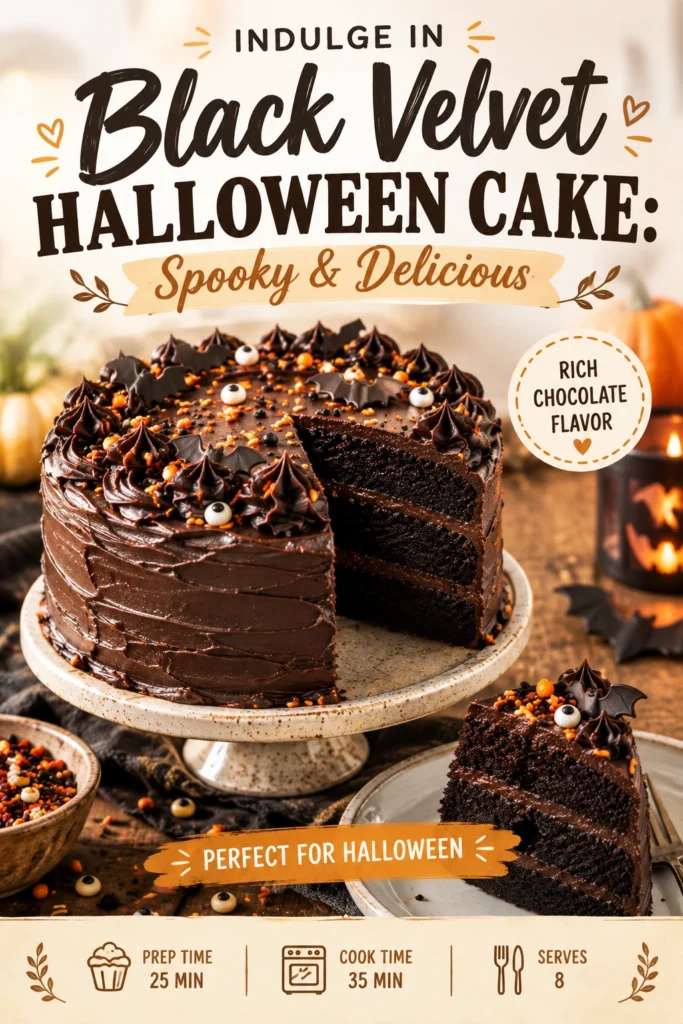
This cake delivers a dense, moist crumb and a deep cocoa flavor that satisfies intense chocolate cravings. The result is a striking visual contrast between the dark sponge and a bright frosting.
Black Velvet Cake is a cocoa-based dessert designed with a dramatic, dark aesthetic for the Halloween season. It balances the richness of dark chocolate with a tender texture.
Bakers appreciate this recipe for its ability to maintain a soft mouthfeel despite the heavy use of dark coloring agents.
The uniqueness lies in the specific blend of cocoa and coloring that creates a void-like appearance without sacrificing the traditional cake flavor.
Unlike store-bought options that often rely on artificial flavorings, this version uses real cocoa and butter for a homemade, high-quality taste.
This dessert serves as a centerpiece for themed parties or a sophisticated treat for those who prefer moody, atmospheric sweets.
The following guide provides the steps and ingredient details needed to achieve a professional finish at home.
- ●Why You’ll Love This Recipe
- ●A Brief Background / Why This Recipe Works
- ●Perfect For Spooky Celebrations and Autumn Parties
- ●Main Ingredient Spotlight: Cocoa Powder
- ●Secondary Ingredient Spotlight: Black Food Coloring
- ●Key Ingredients
- ●How to Make It
- ●Pro Tips
- ●Delicious Variations
- ●Best Ways to Serve
- ●Storage and Leftovers
- ●Frequently Asked Questions
- ●Why This Recipe Belongs in Your Weekly Rotation
- ●Final Thoughts
This cake offers a combination of visual drama and classic comfort that makes it a standout choice for any October gathering.
- ●The deep black color creates an immediate impact on the dessert table.
- ●A moist, velvety texture prevents the cake from feeling dry.
- ●Rich chocolate notes pair perfectly with creamy frosting.
- ●The recipe is scalable for different pan sizes.
- ●It provides a sophisticated alternative to brightly colored treats.
- ●Simple pantry staples form the base of the batter.
- ●The flavor profile is crowd-pleasing for all ages.
- ●It pairs well with other spooky treats like Indulge In Decadent Black Velvet Cupcakes Today Easy Dark Chocolate Dessert
- ●The preparation steps are straightforward and easy to follow.
These elements make the cake both a visual success and a culinary delight.
A Brief Background / Why This Recipe Works |
The concept of velvet cake traditionally refers to a fine-grained crumb and a smooth mouthfeel. -quality cocoa and specific fats, this version achieves that signature softness while maintaining a dark profile.
Balance is key when working with dark dyes and cocoa. The acidity in the recipe helps the colors stay vibrant while ensuring the leavening agents react properly to create a light, airy lift.
The combination of butter and oil provides both flavor and lasting moisture, preventing the cake from becoming crumbly after it cools.
Ultimately, the recipe works because it prioritizes the structural integrity of the cake alongside its aesthetic goals.
Perfect For Spooky Celebrations and Autumn Parties |
This cake is ideal for Halloween parties where a dramatic centerpiece is required to set the mood. Its dark appearance fits perfectly with gothic or haunted house themes.
For those planning a themed dessert spread, this cake complements other items such as Indulge In Irresistible Halloween Brownies Delight Easy Spooky Dessert Ideas
It also works well for autumnal gatherings or late-night movie marathons during the spooky season, offering a decadent treat that feels special without requiring professional pastry skills.
Main Ingredient Spotlight: Cocoa Powder |
Cocoa powder provides the essential chocolate foundation and contributes to the dark base color of the cake. Using a Dutch-processed cocoa results in a smoother, more mellow flavor and a naturally darker hue compared to natural cocoa powder.
Secondary Ingredient Spotlight: Black Food Coloring |
Black food coloring is the tool that transforms a dark chocolate cake into a true black velvet masterpiece. Because black is a difficult color to achieve with food, a concentrated gel or paste is used to avoid adding too much liquid to the batter.
When applied correctly, it blends seamlessly with the cocoa to create a deep, obsidian look. It is important to mix this thoroughly to avoid streaks of color in the final slice.
Key Ingredients |
Each component plays a role in the flavor and structure of the final dessert.
- ●All-purpose flour — provides the necessary structure and support for the cake.
- ●Cocoa powder — delivers the deep chocolate taste and dark base color.
- ●Granulated sugar — adds sweetness and helps keep the crumb moist.
- ●Baking powder — acts as the leavening agent to ensure the cake rises.
- ●Baking soda — reacts with acidic components to create a light texture.
- ●Butter — contributes a rich flavor and a tender mouthfeel.
- ●Eggs — bind the ingredients together and provide stability.
- ●Buttermilk — adds tanginess and tenderizes the gluten in the flour.
- ●Black gel food coloring — creates the signature spooky black appearance.
- ●Vanilla extract — enhances the cocoa notes and adds aromatic depth.
How to Make It |
Follow these steps carefully to ensure the cake reaches the correct height and color.
- Prepare the pans: Grease two 8-inch round cake pans with butter and dust them with cocoa powder. Using cocoa instead of flour prevents white streaks on the sides of your dark cake.
- Cream the fats and sugar: Beat the softened butter and sugar together in a large bowl until the mixture is pale and fluffy. This process incorporates air, which helps the cake stay light despite the heavy coloring.
- Incorporate wet ingredients: Add the eggs one at a time, beating well after each addition. Stir in the vanilla extract and the black gel food coloring until the mixture is a uniform, deep shade.
- Whisk dry components: In a separate bowl, sift together the flour, cocoa powder, baking powder, and baking soda. Sifting is necessary to remove cocoa lumps, which would otherwise appear as brown spots in the black batter.
- Combine the mixtures: Gradually add the dry ingredients to the wet mixture, alternating with the buttermilk. Start and end with the dry ingredients to prevent the batter from separating or becoming too thin.
- Bake the layers: Divide the batter evenly between the pans and bake at 350°F (175°C). Bake for 30 to 35 minutes, or until a toothpick inserted into the center comes out clean or with a few moist crumbs.
- Cool and frost: Allow the cakes to cool in the pans for 10 minutes before transferring them to a wire rack. Once completely cool, frost with a contrasting cream cheese frosting or a dark ganache.
1These small adjustments can significantly improve the quality of your black velvet cake.
- ●2Use room temperature ingredients: Ensure eggs and buttermilk are at room temperature to prevent the batter from curdling.
- ●3Avoid overmixing: Stop stirring as soon as the flour disappears to prevent the cake from becoming tough.
- ●4Use gel coloring: Choose gel or paste colors over liquid drops to maintain the correct batter consistency.
- ●5Sift the cocoa: Always sift cocoa powder through a fine-mesh strainer to ensure a smooth, streak-free finish.
- ●6Cool completely: Wait until the cake is entirely cold before frosting to avoid the frosting melting or sliding off.
Delicious Variations |
You can adapt this recipe to suit different tastes or dietary needs.
- ●Red Velvet Twist: Use red food coloring instead of black for a classic holiday look.
- ●Orange Zest: Add one teaspoon of orange zest to the batter for a chocolate-orange flavor pairing.
- ●Coffee Infusion: Replace a portion of the buttermilk with strong brewed coffee to intensify the chocolate taste.
- ●Gluten-Free Option: Substitute the all-purpose flour with a high-quality 1:1 gluten-free baking blend.
- ●Vegan Version: Use vegan butter and a flax-egg substitute for a plant-based spooky treat.
These changes allow the cake to fit into various party menus while keeping the striking visual appeal.
Best Ways to Serve |
Presentation is everything for a themed cake. Start with a stark white cream cheese frosting to make the black layers pop visually.
- ●Spooky Toppings: Garnish with fresh blackberries, raspberries, or edible silver pearls.
- ●Themed Platter: Serve alongside Delightful Halloween Cookie Cake Spooky Delicious Treats for a full dessert spread.
- ●Plated Style: Slice the cake and serve with a dollop of whipped cream and a drizzle of raspberry coulis.
For a more interactive experience, let guests add their own toppings like chocolate shavings or orange sprinkles.
Serving the cake slightly chilled can also help the layers stay stable and the frosting remain firm.
Storage and Leftovers |
Refrigerating
Store the frosted cake in an airtight container in the refrigerator for up to 5 days. Because of the buttermilk and frosting, refrigeration is necessary to keep the cake fresh and safe.
Reheating
If the cake was refrigerated, allow a slice to sit at room temperature for 30 minutes before eating. Do not microwave the cake if it is frosted, as this will melt the topping.
Freezing
Wrap unfrosted layers in plastic wrap and aluminum foil for up to 3 months. Thaw in the refrigerator overnight before frosting for the best texture.
Frequently Asked Questions |
- ●Q: Why is my cake turning brown instead of black?A: This usually happens if the food coloring is low-quality or if the oven temperature is too high. Ensure you use a concentrated black gel coloring and double-check that your oven is properly calibrated to 350°F to avoid over-browning the edges.
- ●Q: Can I use natural cocoa powder instead of Dutch-processed?A: You can, but natural cocoa is more acidic and lighter in color. This may result in a cake that looks more dark-brown than true black. Dutch-processed cocoa is highly recommended for this specific recipe to achieve the desired deep hue.
- ●Q: How do I prevent the food coloring from staining my teeth?A: While dark colors can leave a temporary tint, using high-quality gel colors in moderation helps. Serving the cake with a contrasting white frosting helps balance the visual intensity and reduces the concentration of dye per bite.
- ●Q: What is the best frosting for Black Velvet Cake?A: A tangy cream cheese frosting is the best choice because it cuts through the richness of the cocoa. Alternatively, a white vanilla buttercream provides a sharp visual contrast that emphasizes the spooky nature of the black sponge.
- ●Q: Can I make this cake in a sheet pan instead of round pans?A: Yes, you can use a 9×13 inch baking pan. You will need to adjust the baking time, typically checking for doneness around 25 to 30 minutes, as thinner layers bake faster than deep round cakes.
Why This Recipe Belongs in Your Weekly Rotation |
While this is a themed dessert, the foundational chocolate cake is a timeless favorite. Once you master the technique of achieving the black color, you can adapt it for any dark-themed event throughout the year.
The reliability of the crumb and the depth of the chocolate flavor make it a superior choice compared to standard boxed mixes. It provides a professional result that impresses guests without requiring advanced culinary training.
Adding this to your repertoire means you always have a go-to recipe for striking desserts that taste as good as they look.
Final Thoughts |
Black Velvet Halloween Cake is a masterful blend of rich cocoa, a velvety texture, and a dramatic visual presentation. It transforms a simple chocolate cake into a thematic experience perfect for the autumn season.
Whether you are hosting a large party or simply enjoy the mood of October, this recipe provides a consistent and delicious result. Its balance of sweetness and depth makes it a satisfying treat for any chocolate lover.
Prepare your ingredients and bring a touch of spooky elegance to your kitchen cake today.
Indulge in Black Velvet Halloween Cake: Spooky & Delicious
- Total Time: 55 minutes
- Yield: 8 servings 1x
Description
A striking, deep-black chocolate cake with a moist, velvety texture and rich cocoa flavor. Perfectly designed for Halloween celebrations with a dramatic visual appeal.
Ingredients
- 2 1/2 cups all-purpose flour
- 1 1/2 cups granulated sugar
- 1/2 cup Dutch-processed cocoa powder
- 1 1/2 tsp baking powder
- 1/2 tsp baking soda
- 1/2 tsp salt
- 1/2 cup unsalted butter, softened
- 2 large eggs, room temperature
- 1 cup buttermilk, room temperature
- 2 tsp vanilla extract
- 2 tsp black gel food coloring
Instructions
- Preheat your oven to 350°F (175°C) and grease two 8-inch round cake pans with butter and cocoa powder.
- Cream together softened butter and granulated sugar until light and fluffy using a hand mixer or stand mixer.
- Beat in the eggs one at a time, then stir in the vanilla extract and black gel food coloring until the color is uniform.
- In a separate bowl, sift together flour, cocoa powder, baking powder, baking soda, and salt.
- Gradually add the dry ingredients to the wet mixture, alternating with buttermilk, starting and ending with the dry ingredients.
- Divide the batter evenly between the prepared pans and bake for 30-35 minutes until a toothpick comes out clean.
- Cool cakes in pans for 10 minutes, transfer to a wire rack to cool completely, and then frost as desired.
- Prep Time: 20 minutes
- Cook Time: 35 minutes
- Category: Dessert
- Method: Baking
- Cuisine: American
