


Intro and Brief Recap
Have you ever wondered what it would be like to enjoy a dish that combines comfort, creativity, and flavor in every bite? Introducing Flavorful Baked Cheese Mummies, a delightful treat that wraps gooey cheese in a crispy blanket, perfect for any gathering or festive occasion. Imagine the aroma wafting through your kitchen as these cheesy wonders bake to golden perfection, enticing everyone to the table.
This recipe is not just about food; it’s about creating memories. I remember hosting a Halloween party where these playful mummies stole the spotlight. The laughter shared over their whimsical appearance and the delight of biting into melty cheese created an atmosphere of joy. Whether you’re celebrating Halloween, hosting a casual get-together, or simply craving something fun and delicious, these Flavorful Baked Cheese Mummies are sure to impress. Get ready for a flavor experience that will leave your guests asking for seconds!
Key Ingredients For Flavorful Baked Cheese Mummies
Here’s what you’ll need to make this delicious dish:
Frozen Puff Pastry Sheets: These sheets create a flaky outer layer; ensure they are thawed before use for easy handling.
Shredded Cheese Blend: Use a mix of mozzarella and cheddar for a perfect combination of gooeyness and flavor.
Egg Wash: A mixture of beaten egg with water helps achieve a golden and glossy finish on the pastry.
Olive Oil: A light brush enhances the flavor and helps in browning the pastry nicely.
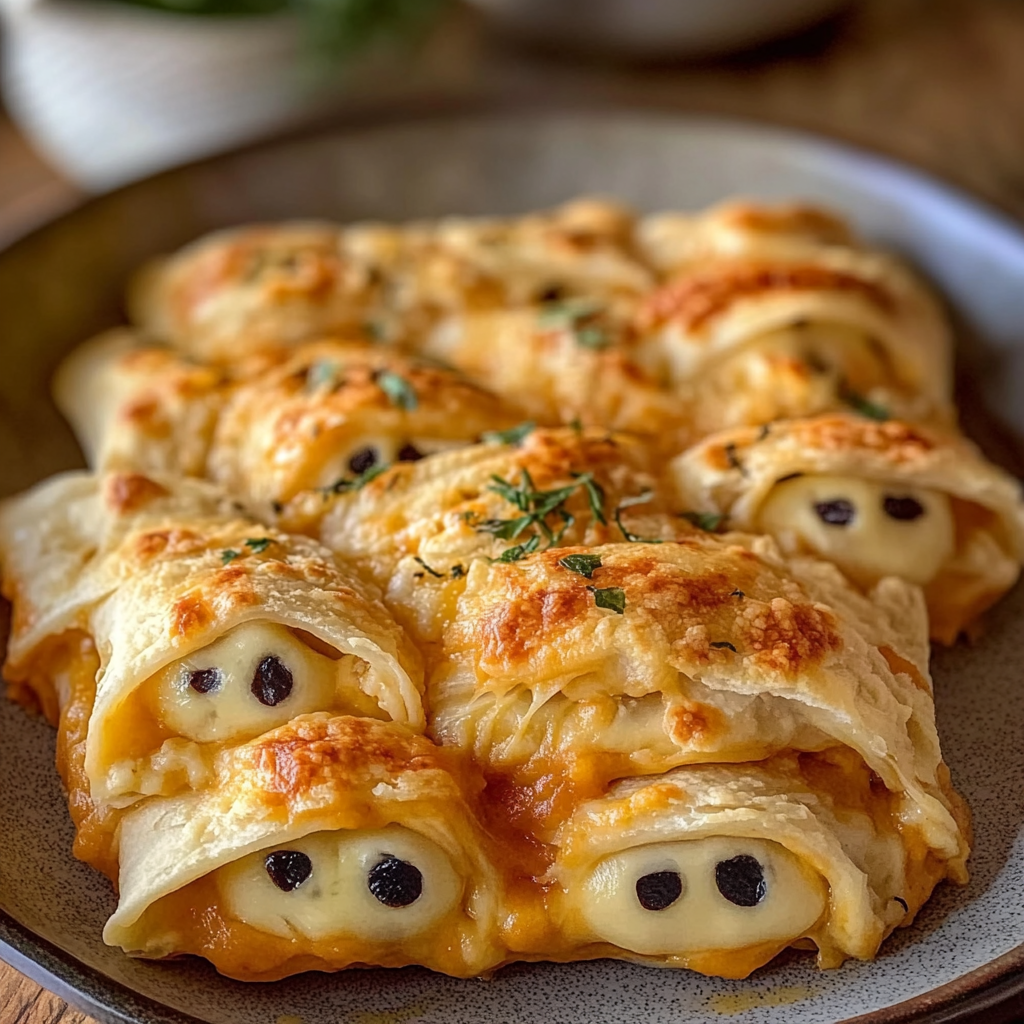
Black Olive Slices: These act as eyes for your mummies; use them for an added touch of fun!
The full ingredients list, including measurements, is provided in the recipe card directly below.
Instructions For Flavorful Baked Cheese Mummies
Follow these simple steps to prepare this delicious dish:
First Step : Preheat the Oven
Preheat your oven to 400°F (200°C). Line a baking sheet with parchment paper to prevent sticking.
Second Step : Prepare Puff Pastry
Roll out your thawed puff pastry sheets on a lightly floured surface. Cut each sheet into strips that are about one inch wide.
Third Step : Fill with Cheese
Place a generous amount of shredded cheese at one end of each puff pastry strip.
Fourth Step : Wrap the Mummies
Carefully wrap each pastry strip around the cheese, leaving some gaps to resemble mummy bandages. Ensure the ends are sealed well.
Fifth Step : Brush with Egg Wash
Transfer the wrapped mummies onto the prepared baking sheet. Brush them lightly with egg wash for that shiny finish.
Sixth Step : Bake
Bake for approximately 15-20 minutes or until golden brown. Once done, remove from the oven and place black olive slices on top as eyes.
Transfer to plates and serve warm for an irresistible treat!
Expert Tips
Here are some helpful tips to ensure the best results for your dish:
Thaw Properly: Always ensure your puff pastry is fully thawed before working with it; this makes rolling easier.
Experiment with Fillings: Feel free to add extra ingredients like herbs or cooked meats inside for more flavor.
Monitor Baking Time: Keep an eye on them while baking; ovens vary, and you want them perfectly golden without burning.
Presentation Ideas
This Flavorful Baked Cheese Mummies is versatile and pairs wonderfully with:
Fresh Vegetable Platter: Serve these delightful mummies alongside a colorful array of fresh vegetables like carrots, cucumber, and bell peppers. The crunchy texture of the veggies complements the gooey cheese perfectly.
Dipping Sauces: Enhance the experience with a variety of dipping sauces. Tomato sauce, ranch dressing, or even a spicy aioli can elevate the flavor profile and add an extra layer of enjoyment.
Seasonal Fruit Salad: A refreshing fruit salad adds a sweet contrast to the savory mummies. Consider using seasonal fruits like berries, melons, and citrus for a vibrant and tasty side.
Storage Tips
To keep your Flavorful Baked Cheese Mummies fresh, store any leftovers in an airtight container. Place them in the refrigerator where they can last for up to three days. Reheat them in the oven to restore their crispy exterior.
Serving Suggestions
These Flavorful Baked Cheese Mummies make a fantastic appetizer or snack for parties and gatherings. Pair them with themed decorations for Halloween or any other festive occasion to create an inviting atmosphere.
Nutritional Information
While enjoying these Flavorful Baked Cheese Mummies, it’s important to consider their nutritional aspects. Each serving provides a good source of protein from the cheese while also offering some carbohydrates from the dough. Adjust portion sizes based on your dietary needs.
FAQs
What types of cheese work best for Flavorful Baked Cheese Mummies?
For creating delicious Flavorful Baked Cheese Mummies, you can use various types of cheese. Some popular options include mozzarella for its meltability, cheddar for a sharper taste, or gouda for its creamy texture. Combining different cheeses can also enhance flavor complexity.
Can I make Flavorful Baked Cheese Mummies ahead of time?
Yes, you can prepare Flavorful Baked Cheese Mummies ahead of time. Assemble them but do not bake until ready to serve. You can store them in the refrigerator for up to 24 hours before baking. This makes them an excellent choice for entertaining guests.
Are there vegetarian options for Flavorful Baked Cheese Mummies?
Absolutely! The base recipe for Flavorful Baked Cheese Mummies is inherently vegetarian as it primarily uses dough and cheese. You can add vegetables like spinach or mushrooms inside the mummies for added nutrition without compromising flavor.
How do I achieve a golden color on my baked mummies?
To achieve that desirable golden color on your Flavorful Baked Cheese Mummies, brush them lightly with egg wash before baking. This simple step enhances browning and gives your mummies an appealing finish that looks as good as they taste.
Flavorful Baked Cheese Mummies
- Total Time: 35 minutes
- Yield: Approximately 12 servings 1x
Description
Indulge in the whimsical delight of Flavorful Baked Cheese Mummies, where gooey cheese is enveloped in crispy puff pastry. These charming treats are perfect for Halloween parties, casual gatherings, or any occasion where fun meets flavor. With their playful appearance and irresistible aroma, these mummies will surely steal the spotlight at your next event.
Ingredients
- 1 package (17.3 oz) frozen puff pastry sheets (2 sheets)
- 2 cups shredded cheese blend (mozzarella and cheddar)
- 1 egg (for egg wash)
- 1 tsp water (for egg wash)
- 2 tsp olive oil
- 8 black olive slices (for eyes)
Instructions
- Preheat the oven to 400°F (200°C) and line a baking sheet with parchment paper.
- On a floured surface, roll out thawed puff pastry and cut into 1-inch wide strips.
- Place a generous amount of shredded cheese at one end of each strip.
- Wrap each strip around the cheese, leaving gaps to mimic mummy bandages, and seal the ends.
- Brush the wrapped mummies lightly with an egg wash made from beating the egg with water.
- Bake for 15-20 minutes until golden brown; place black olive slices on top as eyes before serving.
- Prep Time: 15 minutes
- Cook Time: 20 minutes
- Category: Appetizer
- Method: Baking
- Cuisine: American
Nutrition
- Serving Size: 1 mummy
- Calories: 180
- Sugar: 0g
- Sodium: 250mg
- Fat: 12g
- Saturated Fat: 5g
- Unsaturated Fat: 7g
- Trans Fat: 0g
- Carbohydrates: 13g
- Fiber: 1g
- Protein: 5g
- Cholesterol: 30mg
