

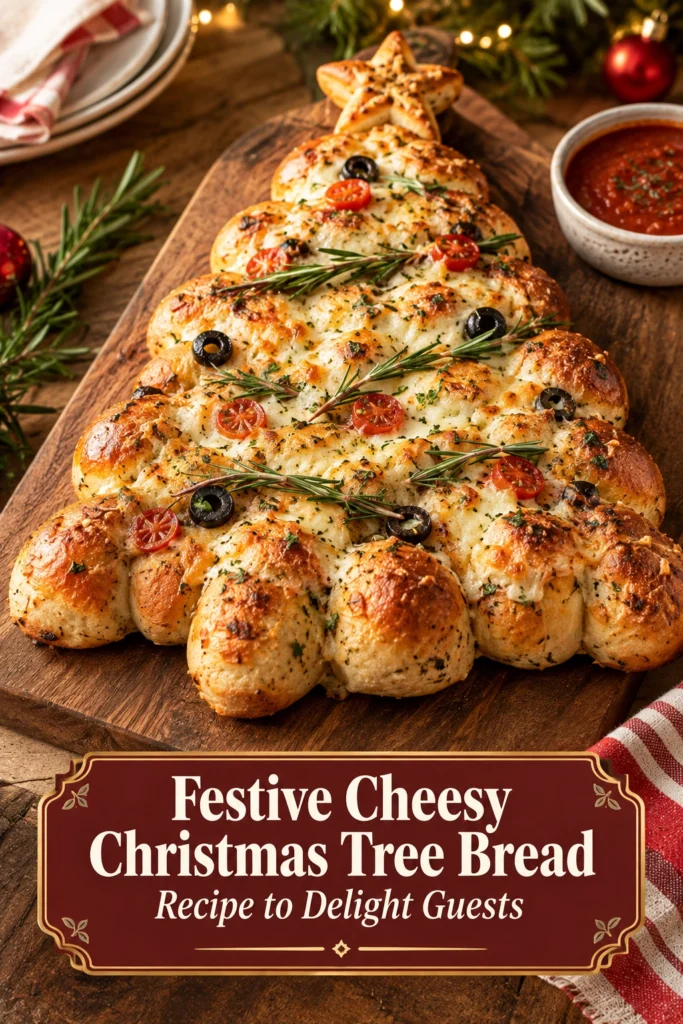
Hosting a holiday party often means juggling multiple appetizers while trying to keep the table looking curated. Finding a dish that looks complex but requires minimal active effort is the key to a stress-free evening.
This Cheesy Christmas Tree Bread is a pull-apart loaf shaped like a festive evergreen. It combines the savory punch of garlic and herbs with a rich, gooey cheese center.
Guests love the interactive nature of this dish, as they can simply tear off a branch of cheesy bread. The result is a golden-brown crust with a soft, airy interior.
Unlike standard garlic bread or store-bought frozen appetizers, this version provides a central focal point for your platter. It turns a simple side dish into a conversation piece.
It is an ideal choice for those who want to impress their guests without spending the entire afternoon in the kitchen. This recipe works well for festive brunches or as a starter for a formal dinner.
Pair this savory bread with Scrumptious Christmas Tree Cupcakes Festive Delights To Try for a complete holiday spread.
Here is everything you need to know to create this holiday centerpiece.
- ●Why You’ll Love This Recipe
- ●A Brief Background / Why This Recipe Works
- ●Perfect For Holiday Gatherings and Party Platters
- ●Main Ingredient Spotlight: Pizza Dough
- ●Secondary Ingredient Spotlight: Mozzarella Cheese
- ●Key Ingredients
- ●How to Make It
- ●Pro Tips
- ●Delicious Variations
- ●Best Ways to Serve
- ●Storage and Leftovers
- ●Frequently Asked Questions
- ●Why This Recipe Belongs in Your Weekly Rotation
- ●Final Thoughts
This recipe balances visual appeal with bold, savory flavors that appeal to both adults and children.
- ●The pull-apart design makes serving effortless for large groups.
- ●It uses a minimal number of ingredients for a high-impact result.
- ●The garlic butter glaze adds a rich, aromatic quality to the crust.
- ●It can be customized with different types of cheeses or herbs.
- ●The baking time is relatively short, allowing for last-minute preparation.
- ●It avoids the need for complex dough kneading if using pre-made options.
- ●The cheese creates a satisfying stretch when the bread is pulled apart.
- ●It fits perfectly on any platter alongside other finger foods.
- ●The festive shape eliminates the need for extra table decorations.
This bread provides a warm, comforting element to any winter menu while keeping the preparation manageable.
A Brief Background / Why This Recipe Works |
The success of this bread lies in the contrast between the crisp, buttered exterior and the molten cheese hidden inside. dough, you create pockets that trap the garlic butter, ensuring every bite is seasoned.
The tree shape is more than just decorative; it increases the surface area of the dough. This allows the oven’s heat to brown the edges of the “branches” while keeping the core of the loaf moist and tender.
Using a high-moisture cheese like mozzarella ensures that the bread remains cohesive yet easy to tear. This creates a consistent texture that doesn’t dry out during the baking process.
The addition of dried herbs provides a subtle earthy note that cuts through the richness of the butter and cheese, balancing the overall flavor profile.
Perfect For Holiday Gatherings and Party Platters |
This bread is a natural fit for Christmas Eve or New Year’s Eve parties where finger foods are preferred over plated meals. Its structure allows it to sit in the center of a grazing board, surrounded olives.
For those who enjoy meal prepping, the dough can be shaped and stored in the fridge, making it simple to pop in the oven just before guests arrive. It serves as a great bridge between a light snack and a heavy meal.
Family dinners benefit from this recipe as it encourages sharing and interaction. It is a tactile experience that makes the meal feel more communal and celebratory.
Main Ingredient Spotlight: Pizza Dough |
Pizza dough is the ideal foundation because it is designed to rise and brown quickly at high temperatures. Its slightly elastic nature allows it to be twisted and shaped without tearing, which is essential for forming the tree branches.
The wheat-based structure provides a chewy texture that holds up well under the weight of melted cheese. If you prefer a more artisanal taste, a sourdough-based pizza dough can be used to add a slight tang to the finished bread.
Secondary Ingredient Spotlight: Mozzarella Cheese |
Mozzarella is chosen for its superior melting properties and mild flavor. It creates the characteristic “cheese pull” that makes pull-apart breads so appealing to guests.
Because mozzarella is not overly salty, it allows the garlic and herbs in the butter glaze to stand out. For a sharper taste, mixing mozzarella with a small amount of parmesan adds a salty, nutty depth to the interior.
Key Ingredients |
Gather these components to ensure the bread has the correct structure and flavor.
- ●Pizza Dough — Provides the structural base and chewy texture.
- ●Mozzarella Cheese — Creates the gooey, melted center.
- ●Unsalted Butter — Acts as the fat source for the glaze and browning.
- ●Garlic — Adds a pungent, savory aroma and taste.
- ●Parsley — Brings a fresh, herbaceous note and green color.
- ●Parmesan Cheese — Adds a salty crust and golden finish.
How to Make It |
Follow these steps carefully to ensure the tree maintains its shape during the bake.
- Prepare the oven and pan: Preheat your oven to 400F and line a baking sheet with parchment paper. This prevents the cheese from sticking to the pan and makes cleanup faster.
- Roll the dough: On a lightly floured surface, roll the pizza dough into a large circle or oval. Ensure the thickness is consistent throughout to avoid uneven baking or raw spots in the center.
- Create the tree structure: Cut a straight line from the center to the edge to form a trunk. Then, cut V-shaped slits along the sides of the center line, leaving the bottom intact. These slits will become the branches of the tree.
- Layer the cheese: Place slices or shreds of mozzarella into each V-shaped cut. Press the cheese slightly into the dough so it stays in place when you twist the branches.
- Twist the branches: Gently twist each strip of dough away from the center. This exposes the cheese and creates the three-dimensional look of a tree. Avoid over-twisting, as the dough may snap.
- Apply the garlic butter: Melt the butter and stir in the minced garlic and parsley. Brush this mixture generously over the entire dough surface, making sure to get into the crevices for maximum flavor.
- Add the finishing touch: Sprinkle grated parmesan over the top of the tree. This adds a salty crunch and helps the bread achieve a deep golden-brown color.
- Bake until golden: Place the tray in the oven for 15 to 20 minutes. Look for the cheese to be bubbling and the edges of the dough to be a rich brown. Avoid overbaking, which can make the bread tough.
1Use these suggestions to refine your technique and improve the final result.
- ●2Use room temperature dough: Let the dough sit for 20 minutes before rolling to make it more pliable and prevent it from shrinking back.
- ●3Avoid excess flour: Use just enough flour to prevent sticking; too much flour on the bottom can create a powdery crust.
- ●4Chill the cheese: Using cold mozzarella slices makes them easier to place into the slits without tearing the dough.
- ●5Brush twice: Apply half the garlic butter before baking and the remaining half immediately after removing the bread from the oven for a glossy finish.
- ●6Use a timer: Because the branches are thin, they can go from golden to burnt quickly; check the bread 2 minutes before the timer ends.
Delicious Variations |
Modify the flavors to suit your preferences or dietary needs.
- ●Pesto Twist: Replace the garlic butter with basil pesto for a vibrant green color and a piney flavor.
- ●Spicy Kick: Add red pepper flakes or chopped jalapeños to the cheese filling for a spicy contrast.
- ●Three-Cheese Blend: Use a mix of mozzarella, provolone, and sharp cheddar for a more complex taste.
- ●Herb Garden: Incorporate dried rosemary and thyme into the butter glaze for a more traditional holiday scent.
- ●Vegan Alternative: Use a plant-based pizza dough and vegan mozzarella with olive oil instead of butter.
These changes allow you to adapt the recipe for different occasions, such as pairing it with Yummy Christmas Tree Brownies Recipe Festive Fun Treats for a sweet and salty combination.
Best Ways to Serve |
Presentation enhances the experience of this festive appetizer.
- ●Place the bread on a wooden board with small bowls of marinara or garlic aioli for dipping.
- ●Serve it alongside a platter of cured meats, grapes, and hard cheeses.
- ●Accompany it with a fresh arugula salad tossed in lemon vinaigrette to balance the richness.
For a more formal setting, place the bread on a ceramic platter and garnish the edges with fresh rosemary sprigs and pomegranate seeds. This emphasizes the holiday theme and adds a pop of color.
Since this is a pull-apart bread, it is best served warm. Encourage guests to tear the branches off themselves, which makes the serving process a part of the entertainment.
Storage and Leftovers |
Refrigerating
Store leftover bread in an airtight container in the refrigerator for up to 3 days. Ensure the bread is completely cooled before sealing to prevent the crust from becoming soggy.
Reheating
Reheat individual pieces in a toaster oven or oven at 350F for 5 to 8 minutes. This restores the crispness of the crust and remelts the cheese more effectively than a microwave.
Freezing
Wrap the baked bread tightly in foil and place it in a freezer bag for up to 2 weeks. Thaw in the fridge overnight before reheating in the oven to maintain the texture.
Frequently Asked Questions |
- ●Q: Can I use homemade dough instead of store-bought?A: Yes, any standard pizza or white bread dough works. If making it from scratch, ensure the dough has completed its first rise so that it is airy enough to expand and brown properly in the oven.
- ●Q: What can I use if I do not have mozzarella?A: Provolone or Monterey Jack are excellent substitutes because they melt well and have mild flavors. Avoid hard cheeses like aged cheddar as the primary filler, as they do not stretch or melt as smoothly.
- ●Q: How do I stop the cheese from leaking out?A: Ensure the cheese is tucked deeply into the dough slits and that you do not overfill the cuts. Twisting the dough tightly around the cheese helps seal it in during the initial phase of baking.
- ●Q: Can this bread be made in advance?A: You can assemble the tree and store it on the baking sheet, covered with plastic wrap, in the fridge for up to 24 hours. Bring it to room temperature for 30 minutes before baking for the best rise.
- ●Q: Why did my bread come out too hard?A: This usually happens if the oven temperature is too low, causing the bread to dry out before it browns. Check your oven with a thermometer to ensure it has reached 400F before sliding the tray in.
- ●Q: Is it possible to make this gluten-free?A: You can use a high-quality gluten-free pizza dough. Be aware that gluten-free dough is less elastic, so you may need to be more gentle when twisting the branches to avoid tearing.
Why This Recipe Belongs in Your Weekly Rotation |
While the shape is festive, the combination of garlic, butter, and cheese is a timeless favorite that works any time of year. the tree shape, this becomes a standard cheesy garlic bread for movie nights or casual dinners.
The versatility of the dough and filling means you can adapt it to whatever ingredients you have on hand. It is a reliable way to incorporate more homemade elements into your meals without requiring hours of labor.
Ultimately, this recipe provides a high reward for very little effort. It brings a sense of occasion to the table, making even a simple Tuesday night feel special when served with a bowl of soup or pasta.
Final Thoughts |
This Cheesy Christmas Tree Bread combines a striking visual presentation with the classic flavors of garlic and melted mozzarella. It is a practical solution for anyone needing a crowd-pleasing appetizer that is as fun to eat as it is to look at.
Whether you are hosting a large holiday bash or just want a cozy treat for your family, this bread is a reliable choice. Its simple assembly and rich taste make it a standout addition to any winter menu.
Bring a touch of warmth and creativity to your kitchen this season savory holiday treat.
Festive Cheesy Christmas Tree Bread Recipe to Delight Guests
- Total Time: 40 minutes
- Yield: 8 servings 1x
Description
A visually striking pull-apart bread shaped like a Christmas tree, filled with melted mozzarella and glazed with garlic butter and parmesan.
Ingredients
- 16 oz store-bought or homemade pizza dough
- 8 oz mozzarella cheese, sliced or shredded
- 4 tbsp unsalted butter, melted
- 3 cloves garlic, minced
- 1 tbsp fresh parsley, chopped
- 1/4 cup grated parmesan cheese
- 1/2 tsp salt
Instructions
- Preheat the oven to 400F (200C) and line a baking sheet with parchment paper.
- On a floured surface, roll the pizza dough into a large circle or oval approximately 1/2 inch thick.
- Cut a straight line from the center to the edge to create the trunk. Cut V-shaped slits along both sides of the center line, leaving the bottom uncut.
- Stuff each V-shaped cut with mozzarella cheese, pressing it firmly into the dough.
- Twist each strip of dough away from the center to create the branches of the tree.
- Combine melted butter, minced garlic, and parsley in a small bowl.
- Brush the garlic butter mixture generously over the entire tree.
- Sprinkle grated parmesan cheese evenly over the top of the dough.
- Bake for 15-20 minutes until the crust is golden brown and the cheese is bubbling.
- Allow to cool for 5 minutes before serving.
- Prep Time: 20 minutes
- Cook Time: 20 minutes
- Category: Appetizer
- Method: Baking
- Cuisine: American
