


Intro and Brief Recap
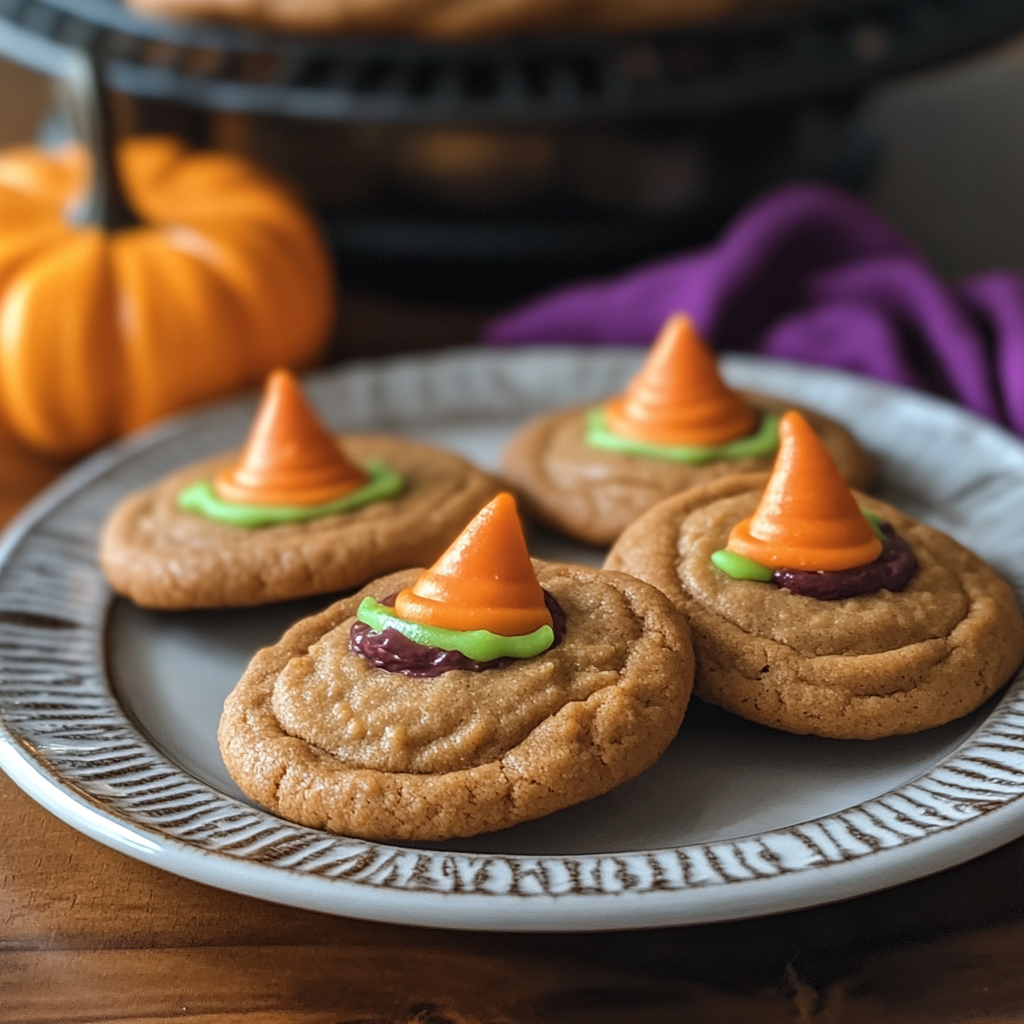
Have you ever wondered how to infuse a little magic into your Halloween celebrations? Imagine stepping into a kitchen filled with the warm aroma of freshly baked cookies, each one adorned with spooky decorations that spark joy and anticipation. Witchy Cookies for Halloween are not just treats; they are delightful morsels that capture the enchanting spirit of this festive season. The combination of rich chocolate and vibrant sprinkles creates a symphony of flavors that will have both kids and adults enchanted.
Every year, I look forward to creating these whimsical cookies, which remind me of childhood nights spent in cozy kitchens, crafting Halloween memories with family. The process is simple yet rewarding, making it an ideal activity for family gatherings or festive parties. With their rich, buttery texture and playful colors, these cookies are perfect for sharing with friends or setting out on the dessert table at your Halloween bash. Get ready to impress your guests with these spellbinding treats that promise to deliver an unforgettable flavor experience!
Key Ingredients For Witchy Cookies for Halloween!
Here’s what you’ll need to make this delicious dish:
All-Purpose Flour: This ingredient forms the backbone of your cookies, providing structure and texture; be sure to sift it for a lighter bake.
Granulated Sugar: It sweetens the batter and aids in achieving that delightful golden color as the cookies bake.
Brown Sugar: Using brown sugar adds moisture and richness, giving the cookies a chewy texture.
Unsalted Butter: Choose high-quality butter for the best flavor; ensure it is softened at room temperature before mixing.
Eggs: They act as binding agents, helping achieve that perfect cookie consistency; use large eggs for best results.
Baking Powder: This leavening agent helps your cookies rise slightly during baking, making them fluffy.
Vanilla Extract: Pure vanilla extract enhances the overall flavor profile of your cookies; opt for high-quality extracts if possible.
Cocoa Powder: Unsweetened cocoa powder adds a rich chocolate flavor while contributing to the lovely dark color of the dough.
Halloween Sprinkles: Use colorful sprinkles to bring your cookies to life; they add fun visual appeal and festive flair.
The full ingredients list, including measurements, is provided in the recipe card directly below.
Instructions For Witchy Cookies for Halloween!
Follow these simple steps to prepare this delicious dish:
First Step : Preheat Your Oven
Preheat your oven to 350°F (175°C) and line two baking sheets with parchment paper to ensure easy cleanup later.
Second Step : Mix Dry Ingredients
In a medium bowl, whisk together all-purpose flour, cocoa powder, baking powder, and salt until fully combined; set aside for later use.
Third Step : Cream Butter and Sugars
In a large bowl, use a hand mixer or stand mixer to cream together softened unsalted butter, granulated sugar, and brown sugar until light and fluffy—about 3-4 minutes.
Fourth Step : Add Eggs and Vanilla
Add eggs one at a time while mixing thoroughly after each addition. Then mix in pure vanilla extract until well blended into the batter.
Fifth Step : Combine Wet and Dry Ingredients
Gradually add the dry ingredients mixture into the wet mixture. Stir until just combined—do not overmix! Fold in Halloween sprinkles gently using a spatula.
Sixth Step : Bake Cookies
Scoop tablespoon-sized amounts of dough onto prepared baking sheets about two inches apart. Bake in preheated oven for 10-12 minutes or until edges are set but centers remain soft. Allow cooling on baking sheets for a few minutes before transferring them to wire racks.
Transfer to plates and serve these enchanting Witchy Cookies at your next Halloween gathering!
Expert Tips
Here are some helpful tips to ensure the best results for your dish:
Chill Your Dough: If time allows, chill your cookie dough in the refrigerator for about an hour before baking; this helps prevent spreading during baking.
Use Fresh Ingredients: Ensure all ingredients are fresh—especially baking powder—to get optimal rise and texture in your cookies.
Keep Cookies Soft: To maintain their softness after baking, store leftover cookies in an airtight container lined with parchment paper.
Presentation Ideas
This Witchy Cookies for Halloween! is versatile and pairs wonderfully with:
A Spooky Treat Table: Arrange your Witchy Cookies on a black lace tablecloth. Add some mini pumpkins and flickering candles to create an eerie vibe.
Decorative Cookie Jars: Display your cookies in clear jars adorned with Halloween-themed ribbons. This not only keeps them fresh but also adds to the Halloween decoration.
Party Favor Bags: Package individual Witchy Cookies in themed bags for guests to take home. It’s a sweet way to remember the spooky celebration!
Tips for Perfect Witchy Cookies
To ensure your Witchy Cookies for Halloween! turn out perfectly, follow these helpful tips:
1. Use fresh ingredients: Ensure all your ingredients are fresh for the best flavor and texture.
2. Chill the dough: If you find the dough too soft, chilling it for about 30 minutes will make it easier to handle.
3. Customize decorations: Get creative with icing colors and edible glitter to enhance the spooky look of your cookies.
Storage Suggestions
After baking your Witchy Cookies for Halloween!, store them properly to maintain freshness:
1. Keep them in an airtight container at room temperature for up to a week.
2. For longer storage, consider freezing them. Wrap each cookie individually in plastic wrap before placing them in a freezer-safe bag.
Variations of Witchy Cookies
You can experiment with different flavors and shapes when making Witchy Cookies for Halloween! Here are a few ideas:
1. Incorporate spices: Add cinnamon or nutmeg to the dough for an autumn flavor boost.
2. Use food coloring: Create vibrant green or purple dough for a more whimsical appearance.
3. Shape options: Use cookie cutters in various spooky designs like bats, ghosts, or witches’ hats.
FAQs
What makes Witchy Cookies special for Halloween?
Witchy Cookies are special for Halloween due to their fun and spooky designs that capture the essence of the holiday. Themed decorations such as orange frosting, candy eyes, or ghostly icing add excitement and creativity, making them perfect treats for gatherings and parties. Their unique appearance delights children and adults alike, elevating any Halloween celebration.
Can I make Witchy Cookies ahead of time?
Yes, you can make Witchy Cookies for Halloween! ahead of time. Prepare the dough a few days in advance and refrigerate it until you’re ready to bake. You can also bake the cookies a week before the occasion and store them in an airtight container to keep them fresh. Just be sure to decorate them closer to the event so they look their best!
How do I get vibrant colors on my Witchy Cookies?
To achieve vibrant colors on your Witchy Cookies for Halloween!, use gel food coloring instead of liquid coloring, as it delivers intense hues without altering the consistency of your icing or dough significantly. Mix small amounts into your frosting until you reach the desired shade. Don’t be shy—experiment with different colors to create a beautiful display!
Can I use gluten-free flour for my Witchy Cookies?
Absolutely! You can substitute all-purpose flour with gluten-free flour blends when making Witchy Cookies for Halloween!. Make sure you choose a blend that includes xanthan gum, as this helps mimic the texture of traditional cookies. Follow package instructions regarding measurements since gluten-free flours may require different ratios than regular flour.
Witchy Cookies for Halloween
- Total Time: 27 minutes
- Yield: Approximately 24 cookies 1x
Description
Witchy Cookies for Halloween are the perfect blend of spooky and sweet, capturing the essence of this festive season. With rich chocolate flavor and vibrant sprinkles, these cookies are not just delicious but a delightful addition to any Halloween celebration. Their soft, buttery texture makes them irresistible, and they’re easy to bake with family or friends. Get ready to enchant your guests with these whimsical treats that promise to elevate your Halloween festivities!
Ingredients
- 2 cups all-purpose flour
- 1 cup granulated sugar
- 1/2 cup brown sugar
- 1 cup unsalted butter (softened)
- 2 large eggs
- 1 tsp baking powder
- 1 tsp vanilla extract
- 1/2 cup unsweetened cocoa powder
- 1/2 cup Halloween sprinkles
- Pinch of salt
Instructions
- Preheat your oven to 350°F (175°C) and line two baking sheets with parchment paper.
- In a bowl, whisk together flour, cocoa powder, baking powder, and salt; set aside.
- In a large bowl, cream together softened butter, granulated sugar, and brown sugar until light and fluffy (3-4 minutes).
- Add eggs one at a time while mixing thoroughly, then mix in vanilla extract.
- Gradually add the dry ingredients to the wet mixture until combined; fold in Halloween sprinkles.
- Scoop tablespoon-sized amounts of dough onto prepared sheets about two inches apart. Bake for 10-12 minutes until edges are set but centers remain soft. Cool on wire racks.
- Prep Time: 15 minutes
- Cook Time: 12 minutes
- Category: Dessert
- Method: Baking
- Cuisine: American
Nutrition
- Serving Size: 1 cookie (30g)
- Calories: 150
- Sugar: 10g
- Sodium: 70mg
- Fat: 8g
- Saturated Fat: 5g
- Unsaturated Fat: 3g
- Trans Fat: 0g
- Carbohydrates: 18g
- Fiber: 1g
- Protein: 2g
- Cholesterol: 20mg
