

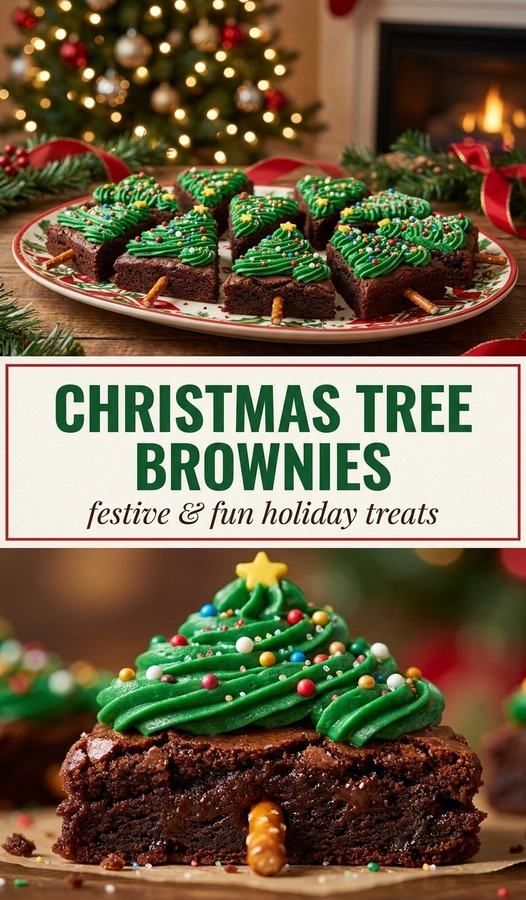
Chocolate often behaves differently depending on the fat content, but in a dense brownie, it provides the structural weight needed to hold a shaped cut.
These festive treats transform a standard chocolate square into a visually striking holiday display. cuts, you create a forest of miniature trees on a single platter.
Readers love this recipe because it combines the comfort of a fudgy brownie with the excitement of seasonal decorating. The result is a dessert that looks professional but requires no special equipment.
What makes this version unique is the balance of a rich, cocoa-heavy base paired with a bright, peppermint-toned frosting. This contrast keeps the dessert from feeling overly heavy.
Unlike store-bought holiday cookies that often taste generic, these brownies offer a deep, homemade chocolate flavor that pairs perfectly with a glass of cold milk.
This recipe is an excellent choice for parents baking with children or anyone hosting a winter gathering. The assembly process is engaging and rewarding for all ages.
The following guide provides every detail needed to achieve the perfect fudge texture and a clean tree shape.
- ●Why You’ll Love This Recipe
- ●A Brief Background / Why This Recipe Works
- ●Perfect For Holiday Parties and Family Baking
- ●Main Ingredient Spotlight: Cocoa Powder
- ●Secondary Ingredient Spotlight: Butter
- ●Key Ingredients
- ●How to Make It
- ●Pro Tips
- ●Delicious Variations
- ●Best Ways to Serve
- ●Storage and Leftovers
- ●Frequently Asked Questions
- ●Why This Recipe Belongs in Your Weekly Rotation
- ●Final Thoughts
Creating a dessert that doubles as a decoration makes holiday hosting much simpler. These brownies provide a high visual impact with minimal effort.
- ●The fudge-like consistency makes them easy to slice into triangles without crumbling.
- ●They use basic pantry staples, meaning no expensive specialty ingredients are required.
- ●The tree shape adds a whimsical touch to any dessert table.
- ●Customizable toppings allow you to match your specific holiday color scheme.
- ●They pair exceptionally well with both coffee and festive cocktails.
- ●The preparation time is short, leaving more room for other holiday chores.
- ●Kids enjoy the process of adding the “ornaments” with sprinkles.
- ●A single batch produces enough treats for a large group.
These brownies bring a sense of joy to the kitchen while delivering a satisfying chocolate experience.
A Brief Background / Why This Recipe Works |
The success of a shaped brownie depends entirely on the moisture content. A cakey brownie tends to crack when cut into small triangles, whereas a fudgy brownie holds its edges cleanly.
Using a combination of melted butter and cocoa creates a dense crumb. This density is what allows the “tree” shapes to remain sturdy when plated and frosted.
The frosting acts as a glue for the decorations. By using a stable buttercream, the sprinkles stay in place and the colors remain vibrant throughout the party.
Combining these elements results in a treat that is as stable as it is delicious.
Perfect For Holiday Parties and Family Baking |
These treats are ideal for busy December weekends when you need a crowd-pleaser that can be made in advance. Since they store well, you can bake them a few days before your event.
Family baking sessions become more interactive with this recipe. While adults handle the oven, children can help arrange the brownie pieces into a tree pattern or apply the colorful sprinkles.
For those who enjoy themed desserts, these serve as a great alternative to Scrumptious Christmas Tree Cupcakes Festive Delights To Try by offering a denser, more chocolate-forward option.
Main Ingredient Spotlight: Cocoa Powder |
Cocoa powder provides the intense, dark color and bitter-sweet profile that defines a classic brownie. Unlike melted chocolate alone, cocoa powder allows for a more controlled texture, ensuring the brownie doesn’t become too greasy.
The fine particles of cocoa integrate seamlessly with the flour, creating a uniform crumb. This consistency is vital when cutting precise shapes, as any large air pockets or lumps could cause the brownie to break.
Secondary Ingredient Spotlight: Butter |
Butter contributes the essential richness and a velvety mouthfeel. When melted, it incorporates into the sugar and eggs to create a smooth emulsion that prevents the brownies from drying out.
The aromatic quality of high-quality butter enhances the chocolate flavor. It also helps the brownies brown slightly on the edges, adding a subtle toasted note to the overall taste.
Key Ingredients |
Each component plays a specific role in achieving the festive look and rich taste of these brownies.
- ●Unsalted Butter — adds richness and a smooth, tender texture.
- ●Granulated Sugar — provides sweetness and creates the classic crinkle top.
- ●Eggs — binds the ingredients and provides structure for cutting.
- ●Cocoa Powder — delivers the deep chocolate flavor and dark brown color.
- ●All-Purpose Flour — gives the brownies their necessary form and stability.
- ●Vanilla Extract — enhances the chocolate notes with a warm aroma.
- ●Powdered Sugar — forms the base of the creamy, spreadable frosting.
- ●Green Food Coloring — transforms the frosting into a festive evergreen hue.
- ●Rainbow Sprinkles — act as colorful ornaments for the tree design.
How to Make It |
Follow these steps carefully to ensure your brownies are fudgy enough to hold their shape and visually appealing.
- Prepare the pan and oven: Preheat your oven to 350°F (175°C) and line an 8×8 inch baking pan with parchment paper. Leaving an overhang of paper on the sides makes it much easier to lift the entire brownie block out for cutting later.
- Melt the butter and sugar: Combine the butter and sugar in a microwave-safe bowl, heating in 30-second bursts until the butter is fully melted. Stir well until the mixture is smooth and glossy to ensure the sugar begins to dissolve.
- Incorporate the wet ingredients: Whisk in the eggs and vanilla extract one at a time. Beating the mixture for about one minute helps create that thin, crackly crust on top, which is a hallmark of a great brownie.
- Sift and fold in dry ingredients: Gently stir in the cocoa powder and flour using a spatula. Mix only until no streaks of flour remain; overmixing at this stage introduces too much air, which leads to a cakey texture rather than a fudgy one.
- Bake until set: Pour the batter into the pan and bake for 20 to 25 minutes. The center should be slightly soft but not jiggly, and a toothpick inserted should come out with a few moist crumbs attached. Avoid overbaking, as this will make the brownies brittle and hard to shape.
- Cool completely: Let the brownies cool in the pan for 15 minutes before transferring them to a wire rack. Attempting to cut the brownies while they are hot will result in jagged edges and crumbling.
- Cut the tree shapes: Lift the brownie block out using the parchment paper. Cut the block into large triangles of varying sizes. Use a small square piece for the trunk of each tree.
- Frost and decorate: Spread the green-tinted frosting over the triangles. While the frosting is still wet, press the sprinkles onto the surface. Arrange the pieces on a platter to look like a festive forest.
1Small adjustments in technique can lead to a significantly better result.
- ●2Use room temperature eggs to ensure they emulsify properly with the melted butter, preventing the batter from separating.
- ●3Sift your cocoa powder through a fine-mesh strainer to remove any stubborn clumps that can create bitter pockets of powder.
- ●4Chill the brownies in the refrigerator for 30 minutes before cutting to achieve perfectly sharp, clean edges for your trees.
- ●5Use a serrated knife and a gentle sawing motion when cutting the triangles to avoid compressing the brownie.
- ●6Apply frosting in thin layers to prevent it from sliding off the sides of the brownie triangles.
Delicious Variations |
You can easily adapt this recipe to suit different tastes or dietary needs.
- ●Peppermint Twist: Add a drop of peppermint extract to the frosting for a refreshing winter flavor.
- ●Nutty Crunch: Stir chopped walnuts or pecans into the batter for added texture.
- ●White Chocolate Snow: Use white chocolate frosting and coconut flakes to create a snowy winter scene.
- ●Double Chocolate: Fold in semi-sweet chocolate chips to the batter for an extra layer of richness.
- ●Gluten-Free Option: Substitute the all-purpose flour with a 1:1 gluten-free flour blend.
These adjustments allow you to tailor the recipe for any occasion, whether you prefer a classic taste or something more adventurous.
Best Ways to Serve |
Presentation is everything when serving themed treats. Arrange the brownie trees on a white platter to make the green frosting pop.
- ●Serve alongside a platter of fresh strawberries and raspberries for a color contrast.
- ●Pair with a warm beverage like hot cocoa or a spiced latte.
- ●Plate them with a dollop of whipped cream and a dusting of powdered sugar to simulate fallen snow.
For a party, you can place the brownies on a tiered dessert stand. This creates a vertical forest effect that adds height to your table display.
If you are serving these as part of a larger spread, consider adding other themed treats like Indulge In Festive Christmas Brownie Truffles Delight for variety in texture.
Storage and Leftovers |
Refrigerating
Store frosted brownies in an airtight container in the refrigerator for up to 5 days. This keeps the frosting stable and the brownie fudgy.
Reheating
If you prefer a warm brownie, microwave a single piece for 5-10 seconds. Note that this will melt the frosting, so it is best done for unfrosted pieces.
Freezing
Freeze unfrosted brownies for up to 3 months tightly in plastic wrap and foil. Thaw at room temperature before frosting.
Frequently Asked Questions |
- ●Q: Why did my brownies come out cakey instead of fudgy?A: This usually happens if you overmix the batter after adding the flour or if you bake them for too long. Overmixing develops too much gluten and incorporates air, which creates a cake-like structure. To prevent this, stir the dry ingredients in gently with a spatula just until combined.
- ●Q: Can I use a different type of frosting?A: Yes, you can use cream cheese frosting or a chocolate ganache. However, buttercream is recommended for the tree shape because it holds its form better and is easier to color with food dye. Ensure your chosen frosting is thick enough to support the weight of the sprinkles.
- ●Q: How do I stop the frosting from bleeding into the brownie?A: The key is to ensure the brownies are completely cooled before frosting. If the brownie is even slightly warm, the fats in the frosting will melt and soak into the cake. Cooling them in the fridge before frosting provides a firm surface that keeps the colors distinct.
- ●Q: What is the best way to cut the triangles without them breaking?A: Chilling the brownies is the most effective method. A cold brownie is much firmer and resists crumbling. Use a sharp knife and wipe the blade with a damp cloth between cuts to remove chocolate residue, ensuring each triangle has a clean, smooth edge.
- ●Q: Can I make these without food coloring?A: You can use matcha powder in the frosting to achieve a natural green color. Matcha adds a subtle earthy taste that pairs well with chocolate. If you prefer no green at all, white frosting with green sprinkles also creates a festive, snowy look.
Why This Recipe Belongs in Your Weekly Rotation |
While these are festive, the base brownie recipe is a versatile staple for any kitchen. Once you master the fudgy texture, you can use it for various occasions throughout the year.
The ability to transform a simple square into a decorative shape makes this a great skill for any home baker. It encourages creativity without requiring hours of labor or professional pastry tools.
Final Thoughts |
These Christmas Tree Brownies combine a decadent, fudgy chocolate base with a playful, festive presentation. They are easy to prepare and provide a wonderful way to bring a bit of holiday cheer to the dessert table.
Whether you are baking with children or preparing a platter for guests, this recipe offers a manageable process with a professional-looking result. The balance of rich cocoa and sweet frosting makes them a crowd-pleasing choice.
Grab your apron and start baking these delightful treats to make your holiday celebrations a little sweeter.
Yummy Christmas Tree Brownies Recipe – Festive & Fun Treats
- Total Time: 45 minutes
- Yield: 16 brownies 1x
Description
Rich, fudgy chocolate brownies cut into festive tree shapes and topped with bright green frosting and colorful sprinkles.
Ingredients
- 1/2 cup unsalted butter, melted
- 1 cup granulated sugar
- 2 large eggs
- 1 teaspoon vanilla extract
- 1/3 cup unsweetened cocoa powder
- 1/2 cup all-purpose flour
- 1/4 teaspoon salt
- 1 cup powdered sugar
- 2 tablespoons unsalted butter, softened
- 1 tablespoon milk
- Green food coloring
- Rainbow sprinkles
Instructions
- Preheat oven to 350°F (175°C) and line an 8×8 inch pan with parchment paper.
- Stir together melted butter and granulated sugar in a bowl.
- Whisk in eggs and vanilla extract until the mixture is smooth.
- Sift in cocoa powder, flour, and salt; fold together with a spatula until just combined.
- Pour batter into the prepared pan and bake for 20-25 minutes until a toothpick comes out with moist crumbs.
- Cool completely in the pan, then lift out using the parchment paper.
- Cut the brownie slab into various sized triangles and small rectangles for trunks.
- Beat powdered sugar, softened butter, and milk together, adding green food coloring.
- Frost the triangles and add sprinkles before arranging on a platter.
- Prep Time: 20 minutes
- Cook Time: 25 minutes
- Category: Dessert
- Method: Baking
- Cuisine: American
